Network
In this day and age, networks rule the world! We use them every day. The Internet is a Wide Area Network (WAN) that connects computers around the world. Through this interconnectivity, we users can navigate the Internet via domain names and their corresponding IP addresses.
But how do our computers navigate the Internet? We have information that we want to send or receive across the Internet from one address to another on a very rudimentary level. These chunks of data are known as packets. These packets are forwarded from router to router according to the router tables of each router. So how could we represent the Internet or any network in a way a computer understands them? The answer is simple, graphs!
If you think of it, each router is a vertex in a graph. Each vertex is connected to other vertices just as a router is connected to other routers. Consequently, we can navigate our network. However, every router could be linked to every other router within a network. Therefore, there could be infinite possibilities to get from your starting router to your target router. Going from A to B comes at a cost. The cost is the connection speed between routers. Naturally, we want to keep our connection speed high. If we send information from one router to another, the cost is the latency or the connection delay. We want to keep the latency as low as possible by finding the path with the lowest connection latency between two routers. We represent that with weighted graphs. When we surf the Internet, we always want to use the fastest connection, which is the path that traverses the edges that sum up to the smallest cost in total.
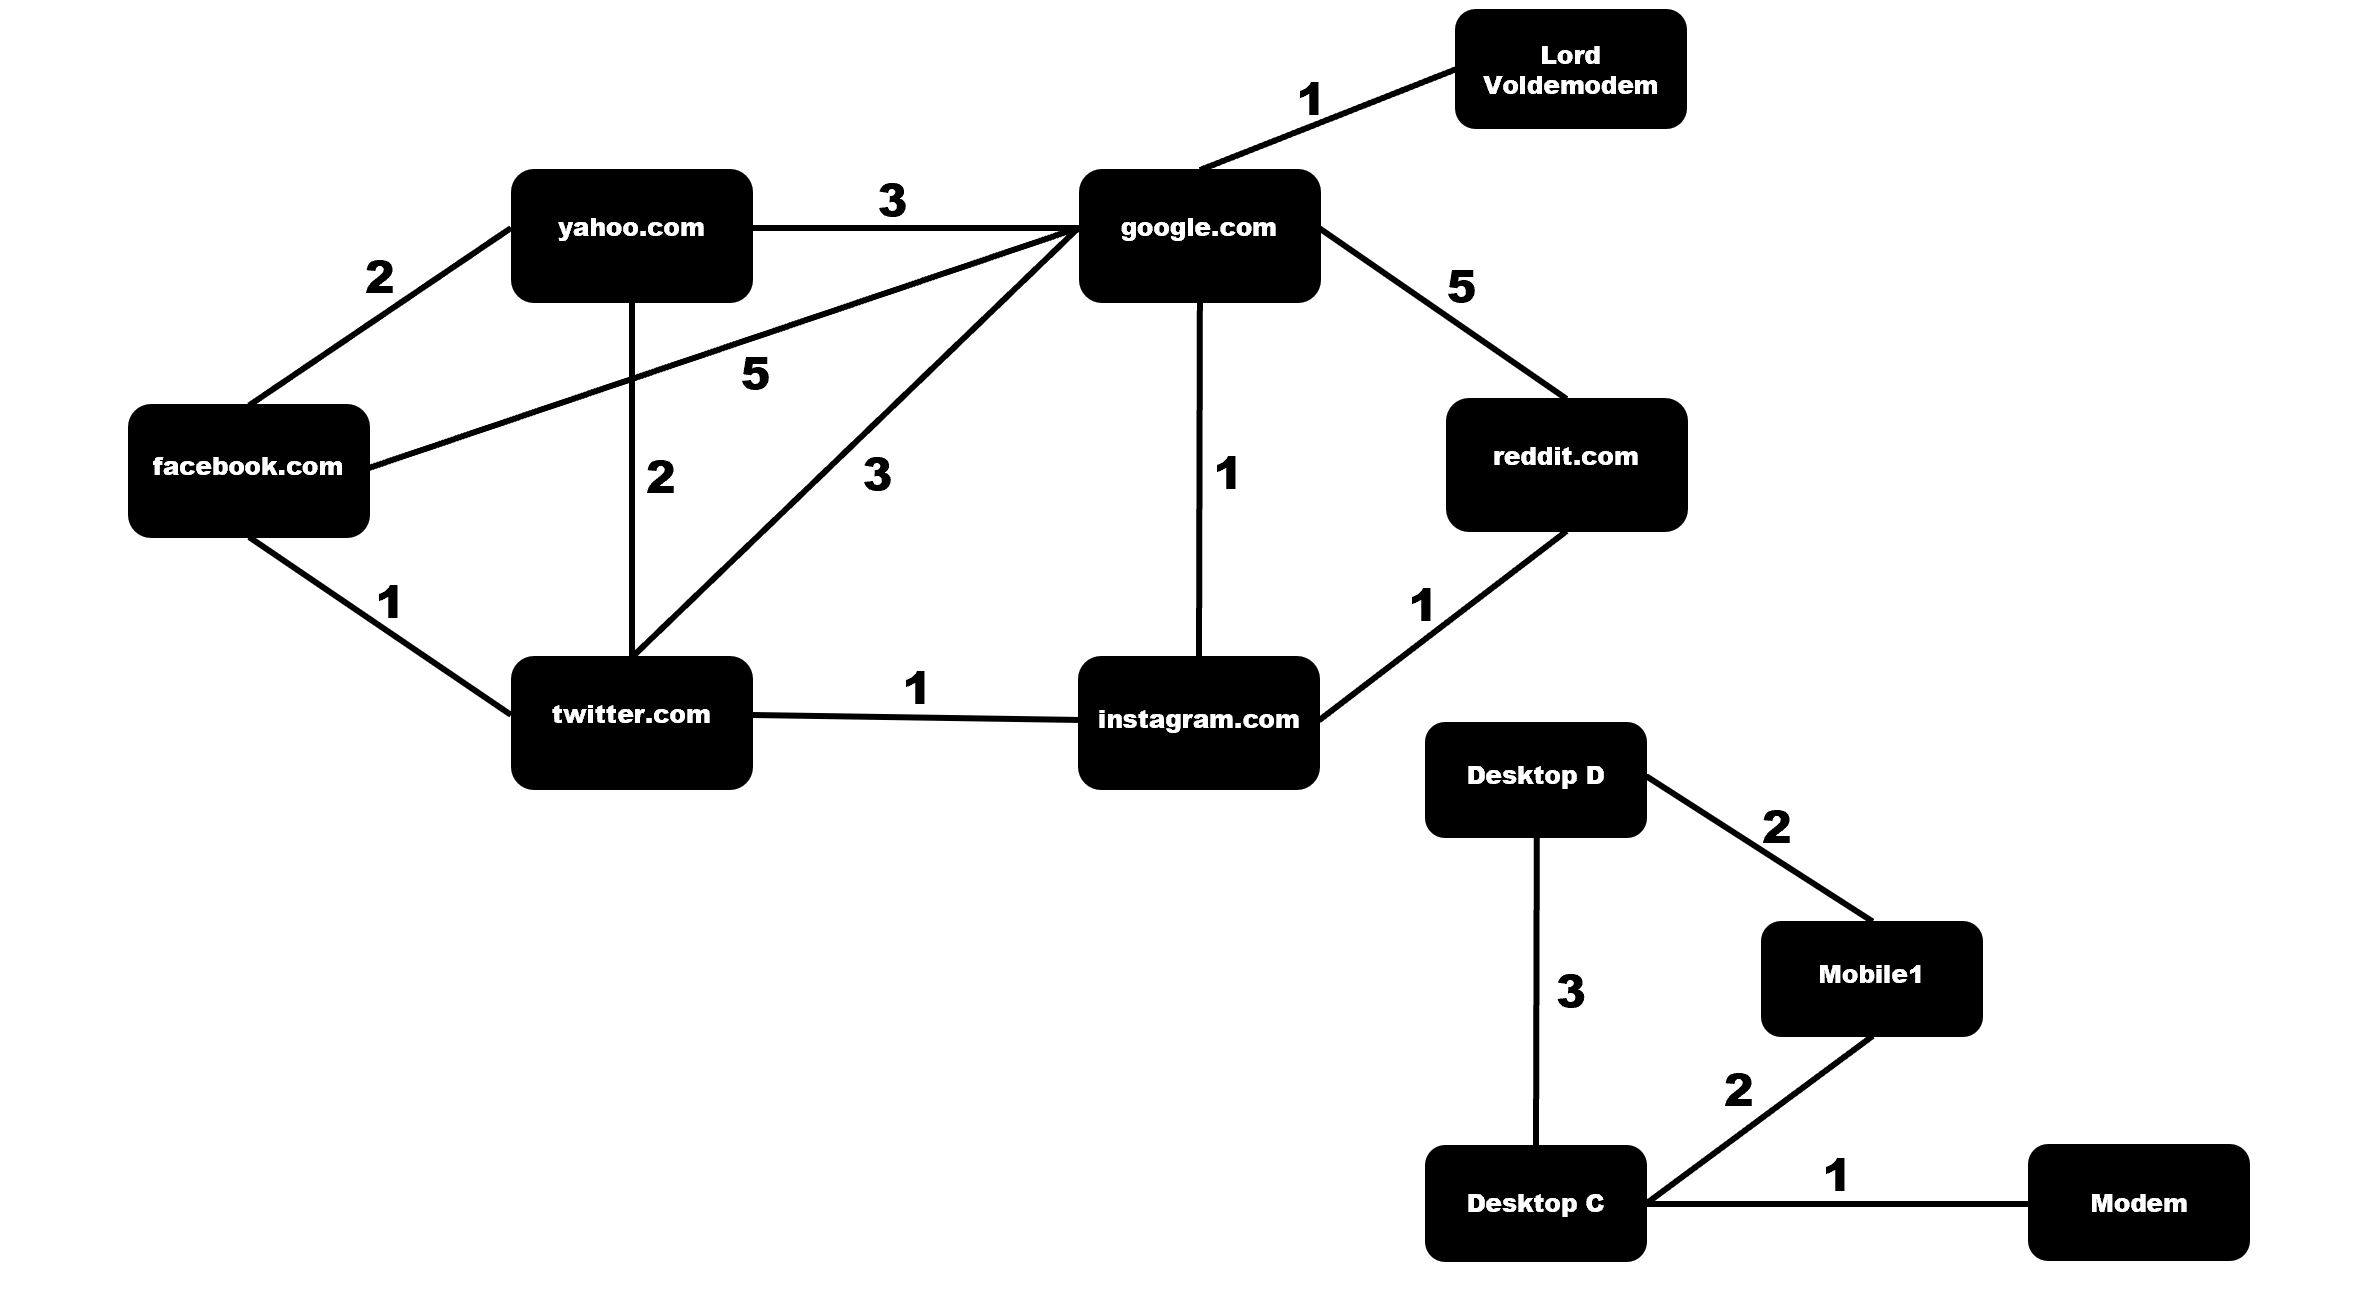
In this problem set, you will implement a graph representing a part of the Internet and a private network, as seen below. In our example, the routers have the names of the domain that is located at that position. Notice that every edge has a weight that is the latency in ms. For example, the cost to go from ‘google.com’ to ‘facebook.com’ directly is 5ms. Hence, to keep our cost low we could also go from ‘google.com’ to ‘facebook.com’ via ‘twitter.com’ in only 4ms. Furthermore, there are multiple networks, not just the Internet as we know it. There are also smaller private networks such as a company’s internal network that is only accessible for members of that company. Therefore, the program you will write can build networks that are not interconnected to one another. Which means they are only accessible separately.
Getting Started
Log into the CS50 IDE and then, in a terminal window, execute each of the below
- Execute
cdto ensure that you’re in~/(i.e., your home directory). - Execute
mkdir Graphs_Treesto make (i.e., create) a directory calledGraphs_Treesin your home directory. - Execute
cd Graphs_Treesto change into that directory - Execute
wget introcs.is.rw.fau.de/assets/pdfs/network.zipto download a (compressed) ZIP file with this problem’s distribution. - Execute
unzip network.zipto uncompress that file. - Execute
rm network.zipfollowed byyesoryto delete that ZIP file. - Execute
ls. You should see this problem’s distribution:network.py and main.py - In order to run the
main.pyfile you will have to execute the following command first in your command line:pip3 install graphviz
Do not change anything in main.py.
Specification
To give you a brief overview of how we were hoping you could implement the Pythonic graph, let us look at the data structure you should use.
In total, you will implement five methods. Notice that our provided class Graph in network.py inherits the properties of a dictionary (dict). As a result, when you have implemented your network correctly, your representation should be a dictionary that somewhat looks like this:
{'yahoo.com': [('facebook.com', 2), ('twitter.com', 2), ('google.com', 3)], 'google.com': [('instagram.com', 1), ('LordVoldemodem', 1), ('yahoo.com', 3), ('twitter.com', 3), ('facebook.com', 5), ('reddit.com', 5)], 'facebook.com': [('twitter.com', 1), ('yahoo.com', 2), ('google.com', 5)], 'twitter.com': [('instagram.com', 1), ('facebook.com', 1), ('yahoo.com', 2), ('google.com', 3)], 'instagram.com': [('google.com', 1), ('reddit.com', 1), ('twitter.com', 1)], 'reddit.com': [('instagram.com', 1), ('google.com', 5)], 'LordVoldemodem': [('google.com', 1)], 'DesktopD': [('Mobile1', 1), ('DesktopC', 3)], 'DesktopC': [('Modem', 1), ('Mobile1', 2), ('DesktopD', 3)], 'Mobile1': [('DesktopD', 1), ('DesktopC', 2)], 'Modem': [('DesktopC', 1)]}
Notice that every vertex is a key in the dictionary mapped to a list of tuples representing the edges, containing the connected vertex and the edge weight.
Be aware that you can not change anything about the parameters and arguments a method can take.
add_vertex()
Adds a vertex to the dictionary. Notice, the method only takes one argument, a key. This key is the domain name for our vertex in our network, i.e., ‘yahoo.com’. When creating an object of type Graph, you create a dictionary, as you can see from the class constructor. Thus, you will have to insert every vertex of the network as a key to your dictionary. The element mapped to every key/vertex in your dictionary is an empty list. Later, the edges can then be added to those lists. For instance, if we added ‘google.com’, the graph vertex that we add to our graph with this method would look like this:
{'google.com' : []}
Hint: This is straight forward; the best implementation requires you to write a single line of code.
Hint: You can already check the correct implementation of the add function by using the check50 command in your terminal: check50 fau-is/IntroCS/PyGraphsTrees/Network
add_edge()
We need this method to connect our routers, i.e., the vertices in our network, with edges. This method takes three parameters. Firstly, ‘origin’, which is the vertex to that we add the edge. Secondly, ‘target’ is the vertex that the edge leads to from ‘origin’, and lastly, the method gets the ‘weight’ of the edge.Look at the connection between “google.com” and “reddit.com” from our network. The internal representation of the graph should look like this:
{‘google.com’ : [(reddit.com, 5)], ‘reddit.com’ : [(google.com, 5)]}
Be careful! Since our network is an undirected graph, every edge goes both ways. Thus, if we have ‘google.com’ as the origin and ‘reddit.com’ as the target, the connection also exists vice versa. ‘reddit.com’ can be the origin with ‘google.com’ as the target. When creating an edge in the method, both vertices that the edge belongs to must be added to or exist in the graph dictionary. When the vertices exist, you can add the edge to both vertices.
Hint: You might want to sort your edges according to the weight and alphabetically when adding them to a vertex
DFS
When we create a network we want to be able to traverse our graph and discover all other vertices that can be reached when we start at a defined vertex. For this purpose we can use a pre-order depth-first search. Therefore, the method dfs() takes two arguments ‘start’ and “vertex=list”. You do not have to give a vertex list as an argument as every time this method will be called, a list will inherently be created. You will now have to write the pre-order depth-first search algorithm that traverses the network in a pre-order fashion, starting at your ‘start’ point and storing the correct path in the vertex list, returning it at the end of the method.
For our example, if we started our pre-order DFS at ‘yahoo.com’, the returned list ‘vertex’ should look like this:
['yahoo.com', 'facebook.com', 'twitter.com', 'instagram.com', 'google.com', 'LordVoldemodem', 'reddit.com']
BFS
When we create a network we want to be able to traverse our graph and discover all other vertices that can be reached when we start at a defined vertex. Therefore, you will now implement a breadth-first search. The method takes one argument ‘start’. Incidentally, this is the router/vertex in our network where we start the BFS. The function should return a vertex list, which you will have to initialize and maintain that has the correct path stored. So take once again our starting point ‘yahoo.com’ the vertex list should look like this:
['yahoo.com', 'facebook.com', 'twitter.com', 'google.com', 'instagram.com', 'LordVoldemodem', 'reddit.com']
Djikstra
Djikstra’s algorithm allows us to calculate the shortest path between one vertex or router and any other vertex in our graph. Let us look at how the algorithm works in general.
- For Djikstra to work, we mark our initial vertex, the one we are starting from, with a current distance of 0. The rest of the vertices are assigned distance infinity. For simplicity sakes, you can also set a value such as 9999; this suffices in our case.
- We now set the non-visited vertex with the smallest current distance as the current vertex X.
- For each neighbor N of our current vertex X, we add the current distance of our current vertex together with the weight of the edge between N and X. If the weight is smaller than the current distance to N, we set the weight as the new current distance of N.
- We need to mark our current vertex X as visited.
- If we have vertices left that are not yet visited, we go back to step ‘2’ and repeat.
Watch this video by Computerphile with Dr. Mike Pound of the Computer Science Department at the University of Nottingham to understand Dijkstra’s algorithm.
Now how should Djikstra work in our graph? We want your Djikstra implementation to take a ‘start’ point and an ‘end’ point. The method should then return a tuple(x, y) with x being the shortest distance between ‘start’ and ‘end’ and y being the path you need to take from ‘start’ to ‘end’ shortest. Take as an example ‘facebook.com’ and ‘reddit.com’, which are farthest apart from one another in terms of relative distance. The return of your program should look like this:
(3, [‘facebook.com’, ‘twitter.com’, ‘instagram.com’, ‘reddit.com’])
check50
To check your program you can run this line in your terminal.
check50 fau-is/IntroCS/PyGraphsTrees/Network
submit50
To submit your program use this line of code.
submit50 fau-is/IntroCS/PyGraphsTrees/Network